

Introduction
Hey there, tech enthusiasts! Are you ready to transform your Raspberry Pi 5 from a cute little box into a powerhouse of container orchestration? Let’s talk about K3s on Raspberry Pi, the lightweight Kubernetes designed to run on less-than-beefy hardware. Why K3s, you ask? Because it’s like Kubernetes, but it’s been on a diet, cutting out all the unnecessary stuff to run smoothly on our Pi.
- K3s: This is a light-weight certified Kubernetes distribution by Rancher Labs, optimized for edge computing and IoT, making it perfect for our Raspberry Pi adventures.
- Raspberry Pi 5: With its beefy Broadcom BCM2712, 2.4GHz quad-core 64-bit ARM Cortex-A76 CPU, and the introduction of PCI Express 2.0, this little board has gotten a significant upgrade. It’s faster, it’s more powerful, and it’s ready to run K3s like a champ.
Prerequisites
However, before we dive into the techy goodness, let’s make sure you’ve got your ducks in a row:
- Hardware:
- Raspberry Pi 5(Kit or Pi): Obviously, the star of the show. More than one is better, but you can run a cluster on a single Raspberry Pi 5.
- MicroSD Card (I use this one): Go for at least Class 10 for performance. We don’t want our cluster to feel like it’s running in molasses.
- Power Supply (Comes in most kits or buy one): Don’t skimp here; use the official one or something that can handle the power draw of Pi 5, 5V/5A DC power via USB-C, with Power Delivery support.
- Ethernet or WiFi: Because without connectivity, our Pi is just a fancy paperweight.
- Software:
- Raspberry Pi OS 64-bit: Because K3s loves 64-bit, and so do we for performance reasons.
- Linux Command Line Knowledge: If you’re not yet friends with the terminal, now’s the time. Don’t worry, I’ll walk you through it.
Setting Up the Raspberry Pi 5
Flashing Raspberry Pi OS:
- Download Raspberry Pi Imager: Grab it from the official Raspberry Pi website.
- Flash the 64-bit Raspberry Pi OS Lite: See my guide Install Raspberry Pi OS Now with Raspberry Pi Imager.
- Boot your Pi and Login
Initial Configuration (for each device):
- Enable SSH: Follow my guide: 3 Quick Ways to Enable SSH
- Update package lists and Upgrade installed packages:
sudo apt update && sudo apt upgrade -yAfter all, nobody likes outdated software. - Configure Network Settings: Set a static IP if you want your Pi to always be found. It’s like giving your Pi a permanent house number.
- Configure
cgroupson boot: This is required to run K3s and only takes a minor edit to the file/boot/firmware/cmdline.txt. To do this, add the following to the endcgroup_memory=1 cgroup_enable=memory.sudo nano /boot/firmware/cmdline.txt

Install K3s on Raspberry Pi
It’s time to install K3s on Raspberry Pi. Thanks to the great script from the k3s developers, the install is a breeze. Follow these directions and you will be up and running in less than a hour
K3s Server Setup
curl -sfL https://get.k3s.io | sh -Once the install completes, we can run the kubectl command to get all nodes and verify things are working.
kubectl get nodesIf you are running a single server cluster, then you’re done. Therefore, skip ahead to start using the cluster. However, if that’s not the case, then we need to copy our server node token so that we can use it to set up the other nodes in our cluster. Here’s what the token looks like: K1072df92d30cc716ab8b46557b31efab3131b2e1b1be3b7271bc3e771ac58136fe::server:df346a203260c1152d0efb1173c23b02.
cat /var/lib/rancher/k3s/server/node-tokenK3s Agent Setup
Next, login to the next Raspberry Pi in your cluster and run the following command, but use your token from above and the IP address for your master node. You can also select a name for the node, but make sure it is unique as K3s doesn’t like shared node names. By default the node name will be your hostname.
curl -sfL https://get.k3s.io | K3S_TOKEN="<K3s_token>" K3S_URL="https://<master_node_ip>:6443" K3S_NODE_NAME="<servername>" sh -The K3s agent will be installed instead of the K3s server because we defined the K3S_URL and K3S_TOKEN variables. Now we can jump back over to the master node and verify everything is working.
Verify your nodes are running
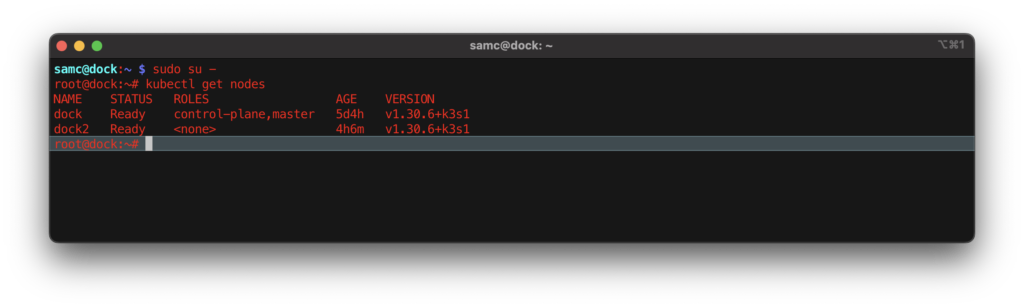
Our next step is to become root, then we can run kubectl the kubernetes control program.
sudo su -
kubectl get nodes
I have a two node cluster, one server and one agent running on separate Raspberry Pis. When you run the above commands you will see something like the following output:
Conclusion and Next Steps
Congratulations! You’ve successfully transformed your Raspberry Pi 5 into a lightweight Kubernetes cluster with K3s. This setup not only showcases the versatility of Raspberry Pi but also demonstrates how accessible powerful container orchestration can be. Whether you’re running a single node or a multi-node cluster, you’ve laid down a solid foundation for experimenting with containerized applications.
Next Steps
- Deploy Your First Application:
- Start simple by deploying an application like Nginx. Use this opportunity to practice with Kubernetes concepts like deployments, services, and persistent volumes. We’ll cover how to do this in our next post, focusing on setting up Nginx with persistent storage and understanding basic Kubernetes networking.
- Explore Kubernetes Features:
- Dive deeper into Kubernetes by exploring features like:
- Secrets for managing sensitive information.
- ConfigMaps for configuration management.
- Ingress for managing external access to the services in your cluster.
- Dive deeper into Kubernetes by exploring features like:
- Monitor and Scale Your Cluster:
- Install monitoring tools like Prometheus and Grafana to keep an eye on your cluster’s health and performance. Learn how to scale your applications horizontally to handle more load.
- Understand and configure network policies to control traffic flow between pods. Experiment with different service types and their implications on your application’s accessibility.
- Security Enhancements:
- Implement security best practices. Look into RBAC (Role-Based Access Control) to manage who can do what in your cluster. Consider using tools like Trivy for vulnerability scanning of your images.
- Backup and Recovery:
- Ensure you have a strategy for backing up your cluster state and application data. Practice restoring from these backups to prepare for real-world scenarios.
- Community and Resources:
- Join Kubernetes and Raspberry Pi communities. Engage with forums, attend meetups, or contribute to open-source projects. Learning from others and sharing your experiences can be incredibly rewarding.
Stay tuned for our next article where we’ll dive into deploying Nginx on your new K3s cluster, giving you practical experience with Kubernetes in action. Keep experimenting, keep learning, and most importantly, have fun with your new tech playground!